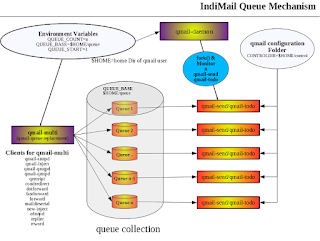
IndiMail allows you to
configure most of its functionality through set of environment
variables. In fact there more more than 200 features that can be
controlled just by setting or un-setting environment variables.
envrules is applicable to
qmail-smtpd, qmail-inject,
qmail-local,
qmail-remote as well. It can also be used
to control programs called by the above programs (e.g
qmail-queue).
IndiMail allows you to
configure quite many things using environment variables. Just set the
environment variable
CONTROLDIR=control2 and all qmail
components of IndiMail start looking for control files in
/var/indimail/control2. You can set
CONTROLDIR=/etc/indimail
and all control files can be conveniently placed in
/etc/indimail.
Some of these environment variables can be set during the startup
of various services.
IndiMail
has all its services configured as directories in the
/service
directory. As an example, if you want to force authenticated SMTP on
all your users, setting the environment variable
REQUIREAUTH
allows you to do so.
% su
# echo 1 >
/service/qmail-smtpd.587/variables/REQUIREAUTH
# svc -d
/service/qmail-smtpd.587
# svc -u
/service/qmail-smtpd.587
sets the
qmail-smtpd running on port 587 to force
authentication.
Setting environment variables in your startup script, in your
.profile or your shell forces you to permanently set the environment
variable to a specific value. Using
envrules,
IndiMail
allows you to set these environment variables specific to different
senders or recipients. envrules allows
IndiMail
platform to be tuned differently for different users. No other
messaging platform, to the best of my knowledge, is capable of doing
that. Another way of saying is that envrules allows your IndiMail
platform to dynamically change its behavior for each and every user.
For the SMTP service, you can set different environment variables
for different senders. All that is required is to define the
following in the control file
/etc/indimail/control/from.envrules.
The format of this file is of the form
pattern:envar1=val,envar2=val,...]
where pattern is a regular expression which matches a sender.
envar1, envar2 are list of environment variables to be set. If val is
omitted, the environment variable is unset. The name of the control
file can be overridden by the environment variable
FROMRULES.
e.g. having the following in from.envrules
*consultant:REQUIREAUTH=1,NORELAY=1
forces all users whose email ids end with '
consultant' to
authenticate while sending mails. Also such users will be prevented
from sending mails to outside your domain.
ceo@example.com:DATASIZE=
Removes all message size restrictions for the user whose email
address is
ceo@example.com, by
unsetting the environment variable DATASIZE.
You can also set envrules on per recipient basis. This gets set
for
qmail-local &
qmail-remote. The control file to
be used in this case is
/etc/indimail/control/rcpt.envrules.
The filename can be overridden by
RCPTRULES environment
variable.
.e.g
*.yahoo.com:OUTGOINGIP=192.168.2.100
The
OUTGOINGIP environment variable is used by qmail-remote
to bind on a specific IP address when connecting to the remote SMTP
server. The above envrule forces qmail-remote to use 192.168.2.100 as
the outgoing IP address when sending mails to any recipient at
yahoo.com.
For SMTP service the following the following list of environment
variables can be modified using envrules
REQUIREAUTH, QREGEX,
ENFORCE_FQDN_HELO, DATABYTES, BADHELOCHECK, BADHELO, BADHOST,
BADHOSTCHECK, TCPPARANOID, NODNSCHECK, VIRUSCHECK, VIRUSFORWARD,
REMOVEHEADERS, ENVHEADERS,
LOGHEADERS, LOGHEADERFD, SIGNATURES, BODYCHECK, BADMAILFROM,
BADMAILFROMPATTERNS, BOUNCEMAIL, CUGMAIL, MASQUERADE, BADRCPTTO,
BADRCPTPATTERNS, GOODRCPTTO, GOODRCPTPATTERNS, GREYIP, GREETDELAY,
CLIENTCA, TLSCIPHERS,
SERVERCERT, BLACKHOLERCPT, BLACKHOLERCPTPATTERNS, SIGNKEY,
SIGNKEYSTALE, SPFBEHAVIOR, TMPDIR, TARPITCOUNT, TARPITDELAY,
MAXRECIPIENTS, MAX_RCPT_ERRCOUNT, AUTH_ALL, CHECKRELAY, CONTROLDIR,
ANTISPOOFING, CHECKRECIPIENT, SPAMFILTER, LOGFILTER, SPAMFILTERARGS,
SPAMEXITCODE, REJECTSPAM, SPAMREDIRECT, SPAMIGNORE,
SPAMIGNOREPATTERNS, FILTERARGS, QUEUEDIR, QUEUE_BASE, QUEUE_START,
QUEUE_COUNT, QMAILQUEUE, QUEUEPROG, RELAYCLIENT, QQEH, BADEXT,
BADEXTPATTERNS, ACCESSLIST, EXTRAQUEUE, QUARANTINE,
QHPSI, QHPSIMINSIZE, QHPSIMAXSIZE, QHPSIRC, QHPSIRN,
USE_FSYNC, SCANCMD, PLUGINDIR,
QUEUE_PLUGIN, PASSWORD_HASH, MAKESEEKABLE, MIN_FREE,
ERROR_FD, DKSIGN, DKVERIFY, DKSIGNOPTIONS, DKQUEUE, DKEXCLUDEHEADERS,
DKIMSIGN, DKIMVERIFY, DKIMPRACTICE, DKIMIDENTITY, DKIMEXPIRE,
SIGN_PRACTICE DKIMQUEUE,
SIGNATUREDOMAINS, and NOSIGNATUREDOMAINS
The following list of environment variables can be modified using
envrules if
QMAILLOCAL and
QMAILREMOTE is set to
/var/indimail/bin/spawn-filter.
QREGEX, SPAMFILTER,
LOGFILTER, SPAMFILTERARGS, FILTERARGS, SPAMEXITCODE, HAMEXITCODE,
UNSUREEXITCODE, REJECTSPAM, SPAMREDIRECT, SPAMIGNORE,
SPAMIGNOREPATTERNS, DATABYTES, MDA, MYSQL_INIT_COMMAND,
MYSQL_READ_DEFAULT_FILE, MYSQL_READ_DEFAULT_GROUP,
MYSQL_OPT_CONNECT_TIMEOUT, MYSQL_OPT_READ_TIMEOUT,
MYSQL_OPT_WRITE_TIMEOUT, QUEUEDIR, QUEUE_BASE, QUEUE_START,
QUEUE_COUNT, and TMPDIR
The following list of environment variables which can be modified
using envrules are specfic to
qmail-remote.
CONTROLDIR, SMTPROUTE,
SIGNKEY, OUTGOINGIP, DOMAINBINDINGS, AUTH_SMTP, MIN_PENALTY, and
MAX_TOLERANCE
The following list of environment variables which can be modified
using envrules are specfic to
qmail-local.
USE_SYNCDIR, USE_FSYNC, and
LOCALDOMAINS
Do
man qmail-smtpd(8),
spawn-filter(8)
to know the full list of environment variables that can be controlled
using envrules.